FreeRTOS列表及列表项
列表和列表项
列表和列表项是 FreeRTOS的一个数据结构,FreeRTOS 大量使用到了列表和列表项,它是 FreeRTOS 的基石
1. 列表和列表项的定义
1.1 列表
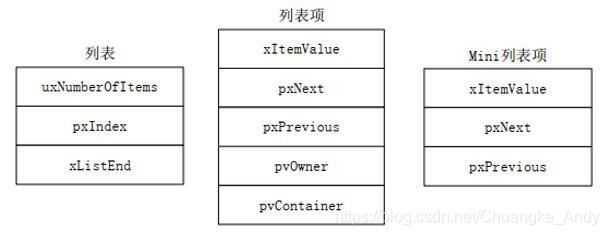
列表是 FreeRTOS 中的一个数据结构,与链表类似,列表被用来跟踪 FreeRTOS 中的任务。其结构体 List_t 在 list.h 文件中被定义
1
2
3
4
5
6
7
8
9
typedef struct xLIST
{
	/* 列表内有效列表项个数 */
	configLIST_VOLATILE UBaseType_t uxNumberOfItems;
	/* 记录当前列表项索引号,用于遍历列表 */
	ListItem_t * configLIST_VOLATILE pxIndex;
	/* 列表中最后一个列表项,表示列表结束 */
	MiniListItem_t xListEnd;
} List_t;
1.2 列表项
列表项就是存放在列表中的项目,FreeRTOS 提供两种类型的列表项:列表项和迷你列表项。列表项的结构体ListItem_t 在 list.h 文件中被定义
1
2
3
4
5
6
7
8
9
10
11
12
13
14
struct xLIST_ITEM
{
	/* 列表项值 */
	configLIST_VOLATILE TickType_t xItemValue;
	/* 指向下一个列表项值 */
	struct xLIST_ITEM * configLIST_VOLATILE pxNext;
	/* 指向上一个列表项值 */
	struct xLIST_ITEM * configLIST_VOLATILE pxPrevious;
	/* 当前列表项的拥有者 */
	void * pvOwner;
	/* 当前列表项归属的列表 */
	void * configLIST_VOLATILE pvContainer;
};
typedef struct xLIST_ITEM ListItem_t;
1.3 迷你列表项
有些情况下不需要列表项这么全的功能,为了避免造成内存浪费,定义了迷你列表项。迷你列表项的结构体 MiniListItem_t 在 list.h 文件中被定义
1
2
3
4
5
6
7
8
9
10
struct xMINI_LIST_ITEM
{
	/* 列表项值 */
	configLIST_VOLATILE TickType_t xItemValue;
	/* 指向下一个列表项值 */
	struct xLIST_ITEM * configLIST_VOLATILE pxNext;
	/* 指向上一个列表项值 */
	struct xLIST_ITEM * configLIST_VOLATILE pxPrevious;
};
typedef struct xMINI_LIST_ITEM MiniListItem_t;
2. 列表和列表项的函数应用
- 列表的初始化:新创建的列表需要对其做初始化处理,其实就是初始化 List_t 结构体中的各个成员变量,通过
vListInitialise()函数来完成,该函数在 list.c 文件中定义
1
2
3
4
5
6
7
8
9
10
11
12
13
void vListInitialise( List_t * const pxList )
{
	/* 此时列表中只有一个列表项xListEnd,索引地址指向尾节点 */
	pxList->pxIndex = ( ListItem_t * ) &( pxList->xListEnd );
	/* xListEnd列表项值初始化为portMAX_DELAY(portmacro.h中定义的宏)*/
	pxList->xListEnd.xItemValue = portMAX_DELAY;
	/* 初始化xListEnd的pxNext变量,此时指向自身 */
	pxList->xListEnd.pxNext = ( ListItem_t * ) &( pxList->xListEnd );
	/* 初始化xListEnd的pxPrevious变量,此时指向自身 */
	pxList->xListEnd.pxPrevious = ( ListItem_t * ) &( pxList->xListEnd );
	/* 当前有效的列表项个数为0,没有算xListEnd */
	pxList->uxNumberOfItems = ( UBaseType_t ) 0U;
}

- 列表项的初始化:新创建的列表项也需要初始化,通过
vListInitialiseItem()函数来完成,该函数在 list.c 文件中定义
1
2
3
4
5
void vListInitialiseItem( ListItem_t * const pxItem )
{
	/* 列表项初始化为不归属任何任务列表所有 */
	pxItem->pvContainer = NULL;
}
- 列表项的插入:将指定列表项插入到列表中,通过
vListInsert()函数来完成
1
2
3
4
5
6
7
8
9
10
11
12
13
14
15
16
17
18
19
20
21
22
23
24
25
26
27
28
void vListInsert( List_t * const pxList, 	//列表项要插入的列表
				  ListItem_t * const pxNewListItem){	//要插入的列表项
	ListItem_t *pxIterator;
	/* 获取要插入的列表项值 */
	const TickType_t xValueOfInsertion = pxNewListItem->xItemValue;
	/* 如获取到的列表项值为最大时,直接插入到尾部 */
	if( xValueOfInsertion == portMAX_DELAY )
	{
		pxIterator = pxList->xListEnd.pxPrevious;
	}
	else{
		/* 从尾节点开始遍历,与下个节点的Value值进行比较,当要插入Value值大于遍历列表项Value时,就获得插入位置(按升序方式插入) */
		for( pxIterator = ( ListItem_t * ) &( pxList->xListEnd ); pxIterator->pxNext->xItemValue <= xValueOfInsertion; pxIterator = pxIterator->pxNext )
		{
			//空循环,什么也不做
		}
	}
	/* 更新后面节点信息 (前后指针进行赋值) */
	pxNewListItem->pxNext = pxIterator->pxNext;
	pxNewListItem->pxNext->pxPrevious = pxNewListItem;
	/* 更新前面节点信息(前后指针进行赋值) */
	pxNewListItem->pxPrevious = pxIterator;
	pxIterator->pxNext = pxNewListItem;
	/* 把列表项归属于当前的列表 */
	pxNewListItem->pvContainer = ( void * ) pxList;
	/* 有效列表项数量进行累加 */
	( pxList->uxNumberOfItems )++;
}
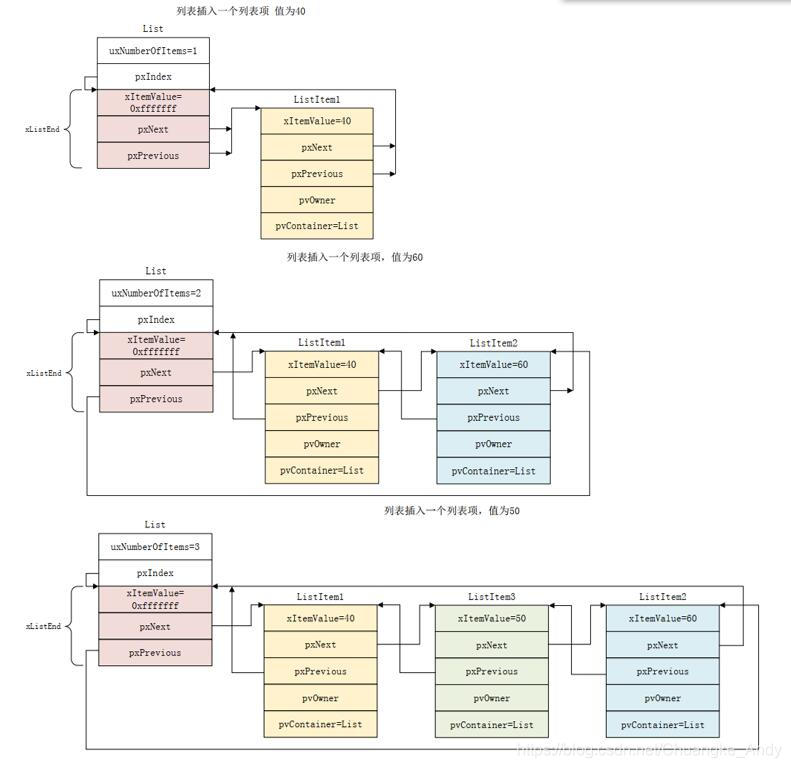
下图演示了向一个空列表中依次插入 40、60 和 50 三个列表项的插入过程
- 列表项的末尾插入:将指定列表项插入到列表末尾,通过
vListInsertEnd()函数来完成
1
2
3
4
5
6
7
8
9
10
11
12
13
14
15
16
void vListInsertEnd( List_t * const pxList, 	//列表项要插入的列表
					 ListItem_t * const pxNewListItem )	//要插入的列表项
{
	/* 获取当前列表索引值	*/
	ListItem_t * const pxIndex = pxList->pxIndex;
	/* 插入到索引值之前,先进行尾部更新	*/
	pxNewListItem->pxNext = pxIndex;
	pxNewListItem->pxPrevious = pxIndex->pxPrevious;
	/* 再进行头部更新 */
	pxIndex->pxPrevious->pxNext = pxNewListItem;
	pxIndex->pxPrevious = pxNewListItem;
	/* 列表项归属于列表 */
	pxNewListItem->pvContainer = ( void * ) pxList;
	/* 更新列表项数目 */
	( pxList->uxNumberOfItems )++;
}
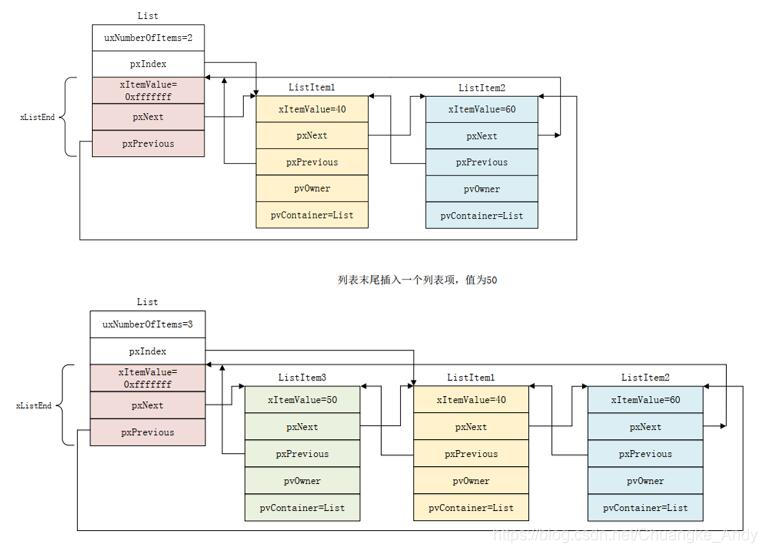
下图演示了向一个列表末尾插入列表项的插入过程
- 列表项的删除:从列表中删除指定的列表项,通过
uxListRemove()函数来完成
1
2
3
4
5
6
7
8
9
10
11
12
13
14
15
16
17
18
19
20
21
22
23
24
25
UBaseType_t uxListRemove( ListItem_t * const pxItemToRemove )
{
	/* 获取列表项所在的列表地址 */
	List_t * const pxList = ( List_t * ) pxItemToRemove->pvContainer;
	/* 将要删除的列表项的前后两个列表项进行连接 */
	pxItemToRemove->pxNext->pxPrevious = pxItemToRemove->pxPrevious;
	pxItemToRemove->pxPrevious->pxNext = pxItemToRemove->pxNext;
	/* Only used during decision coverage testing. */
	mtCOVERAGE_TEST_DELAY();
	/* 索引是否需要更新 */
	if( pxList->pxIndex == pxItemToRemove )
	{
		pxList->pxIndex = pxItemToRemove->pxPrevious;
	}
	else
	{
		mtCOVERAGE_TEST_MARKER();
	}
	/* 被删除列表项的成员变量pvContainer清零 */
	pxItemToRemove->pvContainer = NULL;
	/* 有效列表项数量减一 */
	( pxList->uxNumberOfItems )--;
	/* 返回当前列表的有效列表项数量 */
	return pxList->uxNumberOfItems;
}
- 列表项的遍历:
List_t中的成员变量pxIndex是用来遍历列表的,FreeRTOS 使用如下函数(宏)来完成列表的遍历,每调用一次这个函数,列表的pxIndex变量就会指向下一个列表项,并返回这个列表项的pvOwner变量值
1
2
3
4
5
6
7
8
9
10
11
12
13
14
15
16
/* pxTCB用来保存pxIndex所指向的列表项的pvOwner, pxList表示要遍历的列表 */
#define listGET_OWNER_OF_NEXT_ENTRY( pxTCB, pxList )	\
{	\
	/* 首先获取当前列表 */
	List_t * const pxConstList = ( pxList );	\
	/* 列表的pxIndex变量指向下一个列表项 */
	( pxConstList )->pxIndex = ( pxConstList )->pxIndex->pxNext;	\
	/* 如果pxIndex指向了列表的xListEnd成员变量,表示到了列表末尾 */
	if( ( void * ) ( pxConstList )->pxIndex == ( void * ) &( ( pxConstList )->xListEnd ) )	\
	{	\
		/* 此时就跳过xListEnd,pxIndex再次指向列表头的列表项,这样就完成了一次列表遍历 */
		( pxConstList )->pxIndex = ( pxConstList )->pxIndex->pxNext;	\
	}	\
	/* 获取当前pxIndex指向的所有者(其实就是任务控制块)*/
	( pxTCB ) = ( pxConstList )->pxIndex->pvOwner;	\
}
3. 列表和列表项的应用实例
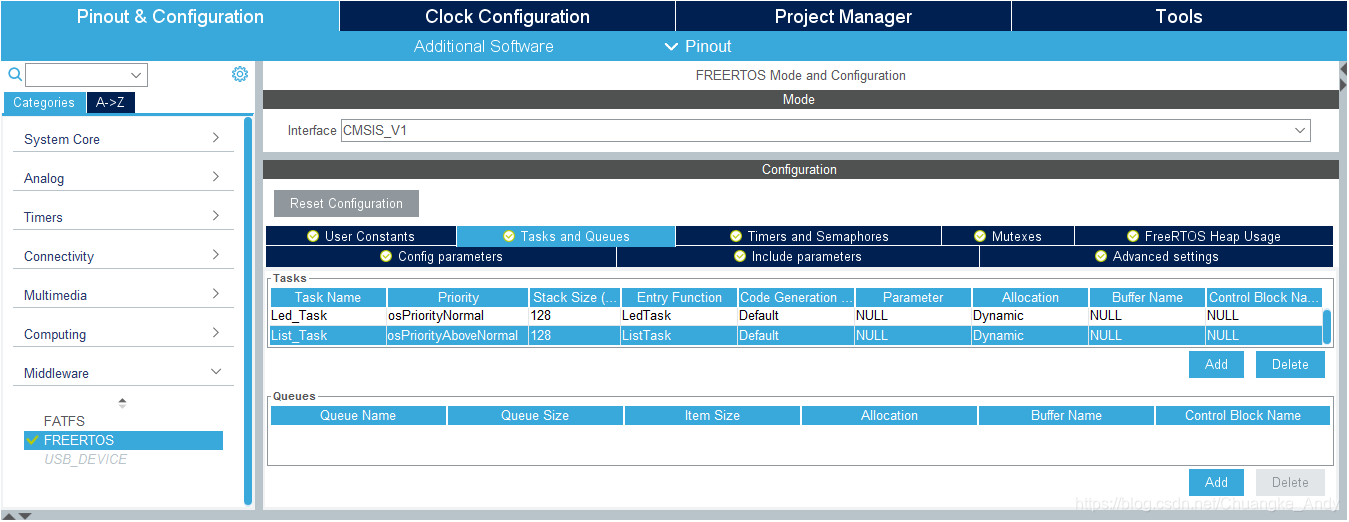
使用 STM32CubeMX 将 FreeRTOS 移植到工程中,并创建两个任务:
Led_Task:D2 指示灯闪烁,用来提示系统正在运行 List_Task:列表和列表项操作任务,调用列表和列表项相关的 API 函数,并通过串口输出的信息来观察这些函数的运行过程
3.1 STM32CubeMX 设置
- RCC 设置外接 HSE,时钟设置为 72M
- PC1 设置为 GPIO 推挽输出模式、上拉、高速、默认输出电平为高电平
- PA0 设置为 GPIO 输入模式、下拉模式;PE2/PE3/PE4 设置为 GPIO 输入模式、上拉模式
- USART1 选择为异步通讯方式,波特率设置为 115200Bits/s,传输数据长度为 8Bit,无奇偶校验,1 位停止位
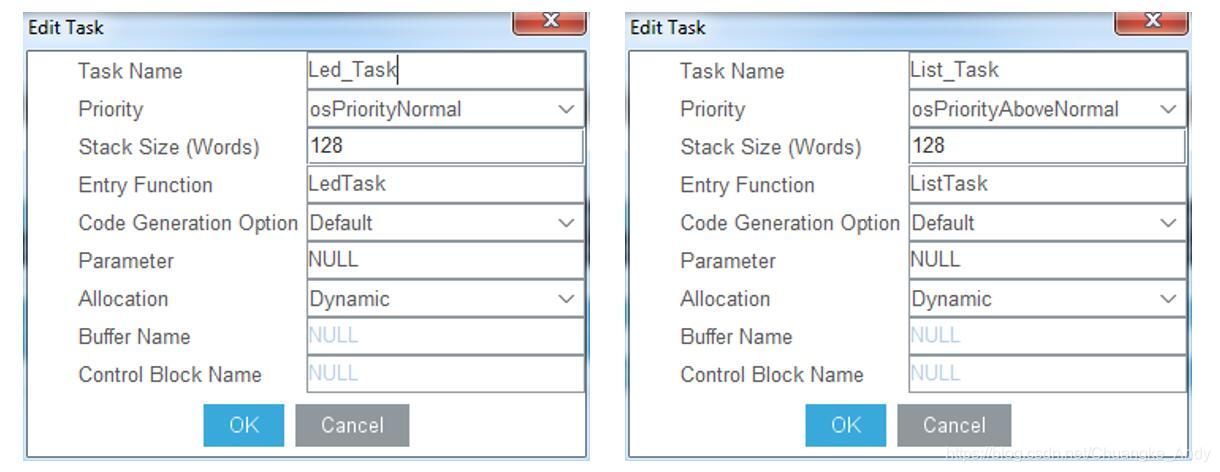
- 激活 FreeRTOS,添加任务,设置任务名称、优先级、堆栈大小、函数名称等参数
- 使用 FreeRTOS 操作系统,一定要将 HAL 库的 Timebase Source 从 SysTick 改为其他定时器,选好定时器后,系统会自动配置 TIM

- 输入工程名,选择路径(不要有中文),选择 MDK-ARM V5;勾选 Generated periphera initialization as a pair of ‘.c/.h’ files per IP ;点击 GENERATE CODE,生成工程代码
3.2 MDK-ARM 软件编程
- 创建按键驱动文件 key.c 和 key.h,参考按键输入例程
- 添加 Led_Task、List_Task 任务函数代码
1
2
3
4
5
6
7
8
9
10
11
12
13
14
15
16
17
18
19
20
21
22
23
24
25
26
27
28
29
30
31
32
33
34
35
36
37
38
39
40
41
42
43
44
45
46
47
48
49
50
51
52
53
54
55
56
57
58
59
60
61
62
63
64
65
66
67
68
69
70
71
72
73
74
75
76
77
78
79
80
81
82
83
84
85
86
87
88
89
90
91
92
93
94
95
96
97
98
99
100
101
102
103
104
105
106
107
108
/******************Led_Task*******************/
void Led_Task(void const * argument){
  for(;;){
	HAL_GPIO_WritePin(GPIOC,GPIO_PIN_1,GPIO_PIN_RESET);
    osDelay(500);  //1ms时基
	HAL_GPIO_WritePin(GPIOC,GPIO_PIN_1,GPIO_PIN_SET);
    osDelay(500);  //1ms时基
  }
}
/*****************List_Task*******************/
void List_Task(void const * argument){
	//列表和列表项初始化
	vListInitialise(&TestList);
	vListInitialiseItem(&ListItem1);
	vListInitialiseItem(&ListItem2);
	vListInitialiseItem(&ListItem3);
	ListItem1.xItemValue=40;	//ListItem1列表项值位40
	ListItem2.xItemValue=60;	//ListItem2列表项值位60
	ListItem3.xItemValue=50;	//ListItem3列表项值位50
	//打印列表和列表项的地址
	printf("/**************列表和列表项地址**************/\r\n");
	printf("项目                      		地址		\r\n");
	printf("TestList                  		%#x			\r\n",(int)&TestList);
	printf("TestList->pxIndex        		%#x			\r\n",(int)TestList.pxIndex);
	printf("TestList->xListEnd        		%#x			\r\n",(int)(&TestList.xListEnd));
	printf("ListItem1                 		%#x			\r\n",(int)&ListItem1);
	printf("ListItem2                 		%#x			\r\n",(int)&ListItem2);
	printf("ListItem3                 		%#x			\r\n",(int)&ListItem3);
	printf("/*******************结束*********************/\r\n");
	printf("PRESS KEY_UP to Continue!\r\n\r\n\r\n");
	while(KEY_Scan(0)!= KEY_UP_PRES) HAL_Delay(10);

	//向列表中添加列表项ListItem1
	vListInsert(&TestList,&ListItem1);	//添加列表项ListItem1
	printf("/*************添加列表项ListItem1************/\r\n");
	printf("项目                         	  地址		\r\n");
	printf("TestList->xListEnd->pxNext   	  %#x		\r\n",(int)(TestList.xListEnd.pxNext));
	printf("ListItem1->pxNext            	  %#x		\r\n",(int)(ListItem1.pxNext));
	printf("TestList->xListEnd->pxPrevious    %#x		\r\n",(int)(TestList.xListEnd.pxPrevious));
	printf("ListItem1->pxPrevious             %#x		\r\n",(int)(ListItem1.pxPrevious));
	printf("/*******************结束*********************/\r\n");
	printf("PRESS KEY_UP to Continue!\r\n\r\n\r\n");
	while(KEY_Scan(0)!= KEY_UP_PRES) HAL_Delay(10);

	//向列表中添加列表项ListItem2
	vListInsert(&TestList,&ListItem2);	//添加列表项ListItem2
	printf("/*************添加列表项ListItem2************/\r\n");
	printf("项目                              地址		 \r\n");
	printf("TestList->xListEnd->pxNext        %#x		 \r\n",(int)(TestList.xListEnd.pxNext));
	printf("ListItem1->pxNext                 %#x		 \r\n",(int)(ListItem1.pxNext));
	printf("ListItem2->pxNext                 %#x		 \r\n",(int)(ListItem2.pxNext));
	printf("TestList->xListEnd->pxPrevious    %#x		 \r\n",(int)(TestList.xListEnd.pxPrevious));
	printf("ListItem1->pxPrevious             %#x		 \r\n",(int)(ListItem1.pxPrevious));
	printf("ListItem2->pxPrevious             %#x		 \r\n",(int)(ListItem2.pxPrevious));
	printf("/*******************结束*********************/\r\n");
	printf("PRESS KEY_UP to Continue!\r\n\r\n\r\n");
	while(KEY_Scan(0)!= KEY_UP_PRES) HAL_Delay(10);

	//向列表中添加列表项ListItem3
	vListInsert(&TestList,&ListItem3);	//添加列表项ListItem3
	printf("/*************添加列表项ListItem3************/\r\n");
	printf("项目                              地址		    \r\n");
	printf("TestList->xListEnd->pxNext        %#x			\r\n",(int)(TestList.xListEnd.pxNext));
	printf("ListItem1->pxNext                 %#x			\r\n",(int)(ListItem1.pxNext));
	printf("ListItem3->pxNext                 %#x			\r\n",(int)(ListItem3.pxNext));
	printf("ListItem2->pxNext                 %#x			\r\n",(int)(ListItem2.pxNext));
	printf("TestList->xListEnd->pxPrevious    %#x			\r\n",(int)(TestList.xListEnd.pxPrevious));
	printf("ListItem1->pxPrevious             %#x			\r\n",(int)(ListItem1.pxPrevious));
	printf("ListItem3->pxPrevious             %#x			\r\n",(int)(ListItem3.pxPrevious));
	printf("ListItem2->pxPrevious             %#x			\r\n",(int)(ListItem2.pxPrevious));
	printf("/*******************结束*********************/\r\n");
	printf("PRESS KEY_UP to Continue!\r\n\r\n\r\n");
	while(KEY_Scan(0)!= KEY_UP_PRES) HAL_Delay(10);

	//从列表中删除列表项ListItem2
	uxListRemove(&ListItem2);						//删除列表项ListItem2
	printf("/*************删除列表项ListItem2************/\r\n");
	printf("项目                              地址		    \r\n");
	printf("TestList->xListEnd->pxNext        %#x			\r\n",(int)(TestList.xListEnd.pxNext));
	printf("ListItem1->pxNext                 %#x			\r\n",(int)(ListItem1.pxNext));
	printf("ListItem3->pxNext                 %#x			\r\n",(int)(ListItem3.pxNext));
	printf("TestList->xListEnd->pxPrevious    %#x			\r\n",(int)(TestList.xListEnd.pxPrevious));
	printf("ListItem1->pxPrevious             %#x			\r\n",(int)(ListItem1.pxPrevious));
	printf("ListItem3->pxPrevious             %#x			\r\n",(int)(ListItem3.pxPrevious));
	printf("/*******************结束*********************/\r\n");
	printf("PRESS KEY_UP to Continue!\r\n\r\n\r\n");
	while(KEY_Scan(0)!= KEY_UP_PRES) HAL_Delay(10);

	//向列表末尾添加列表项ListItem2
	TestList.pxIndex=TestList.pxIndex->pxNext;
	vListInsertEnd(&TestList,&ListItem2);				//列表末尾添加列表项ListItem2
	printf("/***********末尾添加列表项ListItem2**********/\r\n");
	printf("项目                              地址		    \r\n");
	printf("TestList->pxIndex                 %#x			\r\n",(int)TestList.pxIndex);
	printf("TestList->xListEnd->pxNext        %#x			\r\n",(int)(TestList.xListEnd.pxNext));
	printf("ListItem2->pxNext                 %#x			\r\n",(int)(ListItem2.pxNext));
	printf("ListItem1->pxNext                 %#x			\r\n",(int)(ListItem1.pxNext));
	printf("ListItem3->pxNext                 %#x			\r\n",(int)(ListItem3.pxNext));
	printf("TestList->xListEnd->pxPrevious    %#x			\r\n",(int)(TestList.xListEnd.pxPrevious));
	printf("ListItem2->pxPrevious             %#x			\r\n",(int)(ListItem2.pxPrevious));
	printf("ListItem1->pxPrevious             %#x			\r\n",(int)(ListItem1.pxPrevious));
	printf("ListItem3->pxPrevious             %#x			\r\n",(int)(ListItem3.pxPrevious));
	printf("/*******************结束*********************/\r\n\r\n\r\n");
  for(;;){
	printf("ListTask is Runing!\r\n");
    osDelay(1000);
  }
}
3.3 下载验证
编译无误下载到开发板后,打开串口调试助手,可以看到串口首先打印出列表和列表项地址信息;根据提示按下 K_UP 按键,依次执行插入三个列表项、删除列表项 2、列表末尾插入列表项 2 的程序并通过串口打印出相关地址信息;最后执行 for 循环中的 printf 语句,D2 指示灯开始闪烁
1
2
3
4
5
6
7
8
9
10
11
12
13
14
15
16
17
18
19
20
21
22
23
24
25
26
27
28
29
30
31
32
33
34
35
36
37
38
39
40
41
42
43
44
45
46
47
48
49
50
51
52
53
54
55
56
57
58
59
60
61
62
63
64
65
66
67
68
69
70
71
/**************列表和列表项地址**************/
项目                              地址
TestList                          0x20000080
TestList->pxIndex                 0x20000088
TestList->xListEnd                0x20000088
ListItem1                         0x20000094
ListItem2                         0x200000a8
ListItem3                         0x200000bc
/*******************结束*********************/
PRESS KEY_UP to Continue!

/*************添加列表项ListItem1************/
项目                              地址
TestList->xListEnd->pxNext        0x20000094
ListItem1->pxNext                 0x20000088
TestList->xListEnd->pxPrevious    0x20000094
ListItem1->pxPrevious             0x20000088
/*******************结束*********************/
PRESS KEY_UP to Continue!

/*************添加列表项ListItem2************/
项目                              地址
TestList->xListEnd->pxNext        0x20000094
ListItem1->pxNext                 0x200000a8
ListItem2->pxNext                 0x20000088
TestList->xListEnd->pxPrevious    0x200000a8
ListItem1->pxPrevious             0x20000088
ListItem2->pxPrevious             0x20000094
/*******************结束*********************/
PRESS KEY_UP to Continue!

/*************添加列表项ListItem3************/
项目                              地址
TestList->xListEnd->pxNext        0x20000094
ListItem1->pxNext                 0x200000bc
ListItem3->pxNext                 0x200000a8
ListItem2->pxNext                 0x20000088
TestList->xListEnd->pxPrevious    0x200000a8
ListItem1->pxPrevious             0x20000088
ListItem3->pxPrevious             0x20000094
ListItem2->pxPrevious             0x200000bc
/*******************结束*********************/
PRESS KEY_UP to Continue!

/*************删除列表项ListItem2************/
项目                              地址
TestList->xListEnd->pxNext        0x20000094
ListItem1->pxNext                 0x200000bc
ListItem3->pxNext                 0x20000088
TestList->xListEnd->pxPrevious    0x200000bc
ListItem1->pxPrevious             0x20000088
ListItem3->pxPrevious             0x20000094
/*******************结束*********************/
PRESS KEY_UP to Continue!

/***********末尾添加列表项ListItem2**********/
项目                              地址
TestList->pxIndex                 0x20000094
TestList->xListEnd->pxNext        0x200000a8
ListItem2->pxNext                 0x20000094
ListItem1->pxNext                 0x200000bc
ListItem3->pxNext                 0x20000088
TestList->xListEnd->pxPrevious    0x200000bc
ListItem2->pxPrevious             0x20000088
ListItem1->pxPrevious             0x200000a8
ListItem3->pxPrevious             0x20000094
/*******************结束*********************/

ListTask is Runing!
ListTask is Runing!
ListTask is Runing!
以上转载自博主“安迪西嵌入式”的FreeRTOS专栏,仅作学习记录,如有侵权,请联系删除。
本文由作者按照 CC BY 4.0 进行授权